How to change your bike saddle
Whether you're looking to change your saddle because you've just bought one from us, or you've picked one up from elsewhere, we thought it would be useful to put together a quick guide. Here we'll outline the basics of how to remove your existing saddle, how to install your new saddle, and also how to position it to ensure you're in the best possible riding position.
What you'll need:
Bike
Bike saddle
Allen key
1. Remove existing saddle
Your saddle is attached to the seat post by a bolt (or in some cases two bolts).
You can loosen this using an Allen key (sometimes called a hex key) by turning the bolt anti-clockwise. If you've had the bike a while and the bolt is stiff or rusty, you may need to apply some lubricant to the bolt hole and wait a few minutes.
Generally you'll be able to remove the saddle without removing the bolt completely. Once loose you should be able to raise the top clamp and turn it 90º so that it no longer sits directly on the saddle rails. At this point you can remove the existing saddle by lifting it gently off the seat post.

Left to right: Loosening bolt - Rotating top clamp - Lifting saddle off
2. Installing your new saddle
You'll want to start by making sure the seat post clamp is clean - a piece of kitchen roll will be sufficient to wipe away any dirt. Next apply a thin layer of lubricant to the clamp and bolt hole.
Now position the saddle onto the bottom clamp, and rotate the top clamp back into position. Next tighten the bolt until is gently holding the saddle in place - don't tighten it too far right away as you'll first want to make sure that the angle and set back of the saddle are correct.
3. Positioning the saddle
3.1 Saddle tilt
Different cyclists have different preferences, but generally if the saddle rails run roughly horizontal then you're not far off. In competitive racing there are regulations that you can't tilt the saddle more than 10º away from horizontal - although for comfort and convenience, it's unlikely that you'll want to tilt it as much as this anyway. If unsure it's best to start with horizontal rails, and to adjust further down the line, if you decide you want something different. Occasionally, if you're planning a ride that involves a lot of uphill cycling, you might choose to tilt your saddle forwards a little. Conversely, if you're planning a downhill route, you might want adjust the saddle to tilt it backwards.
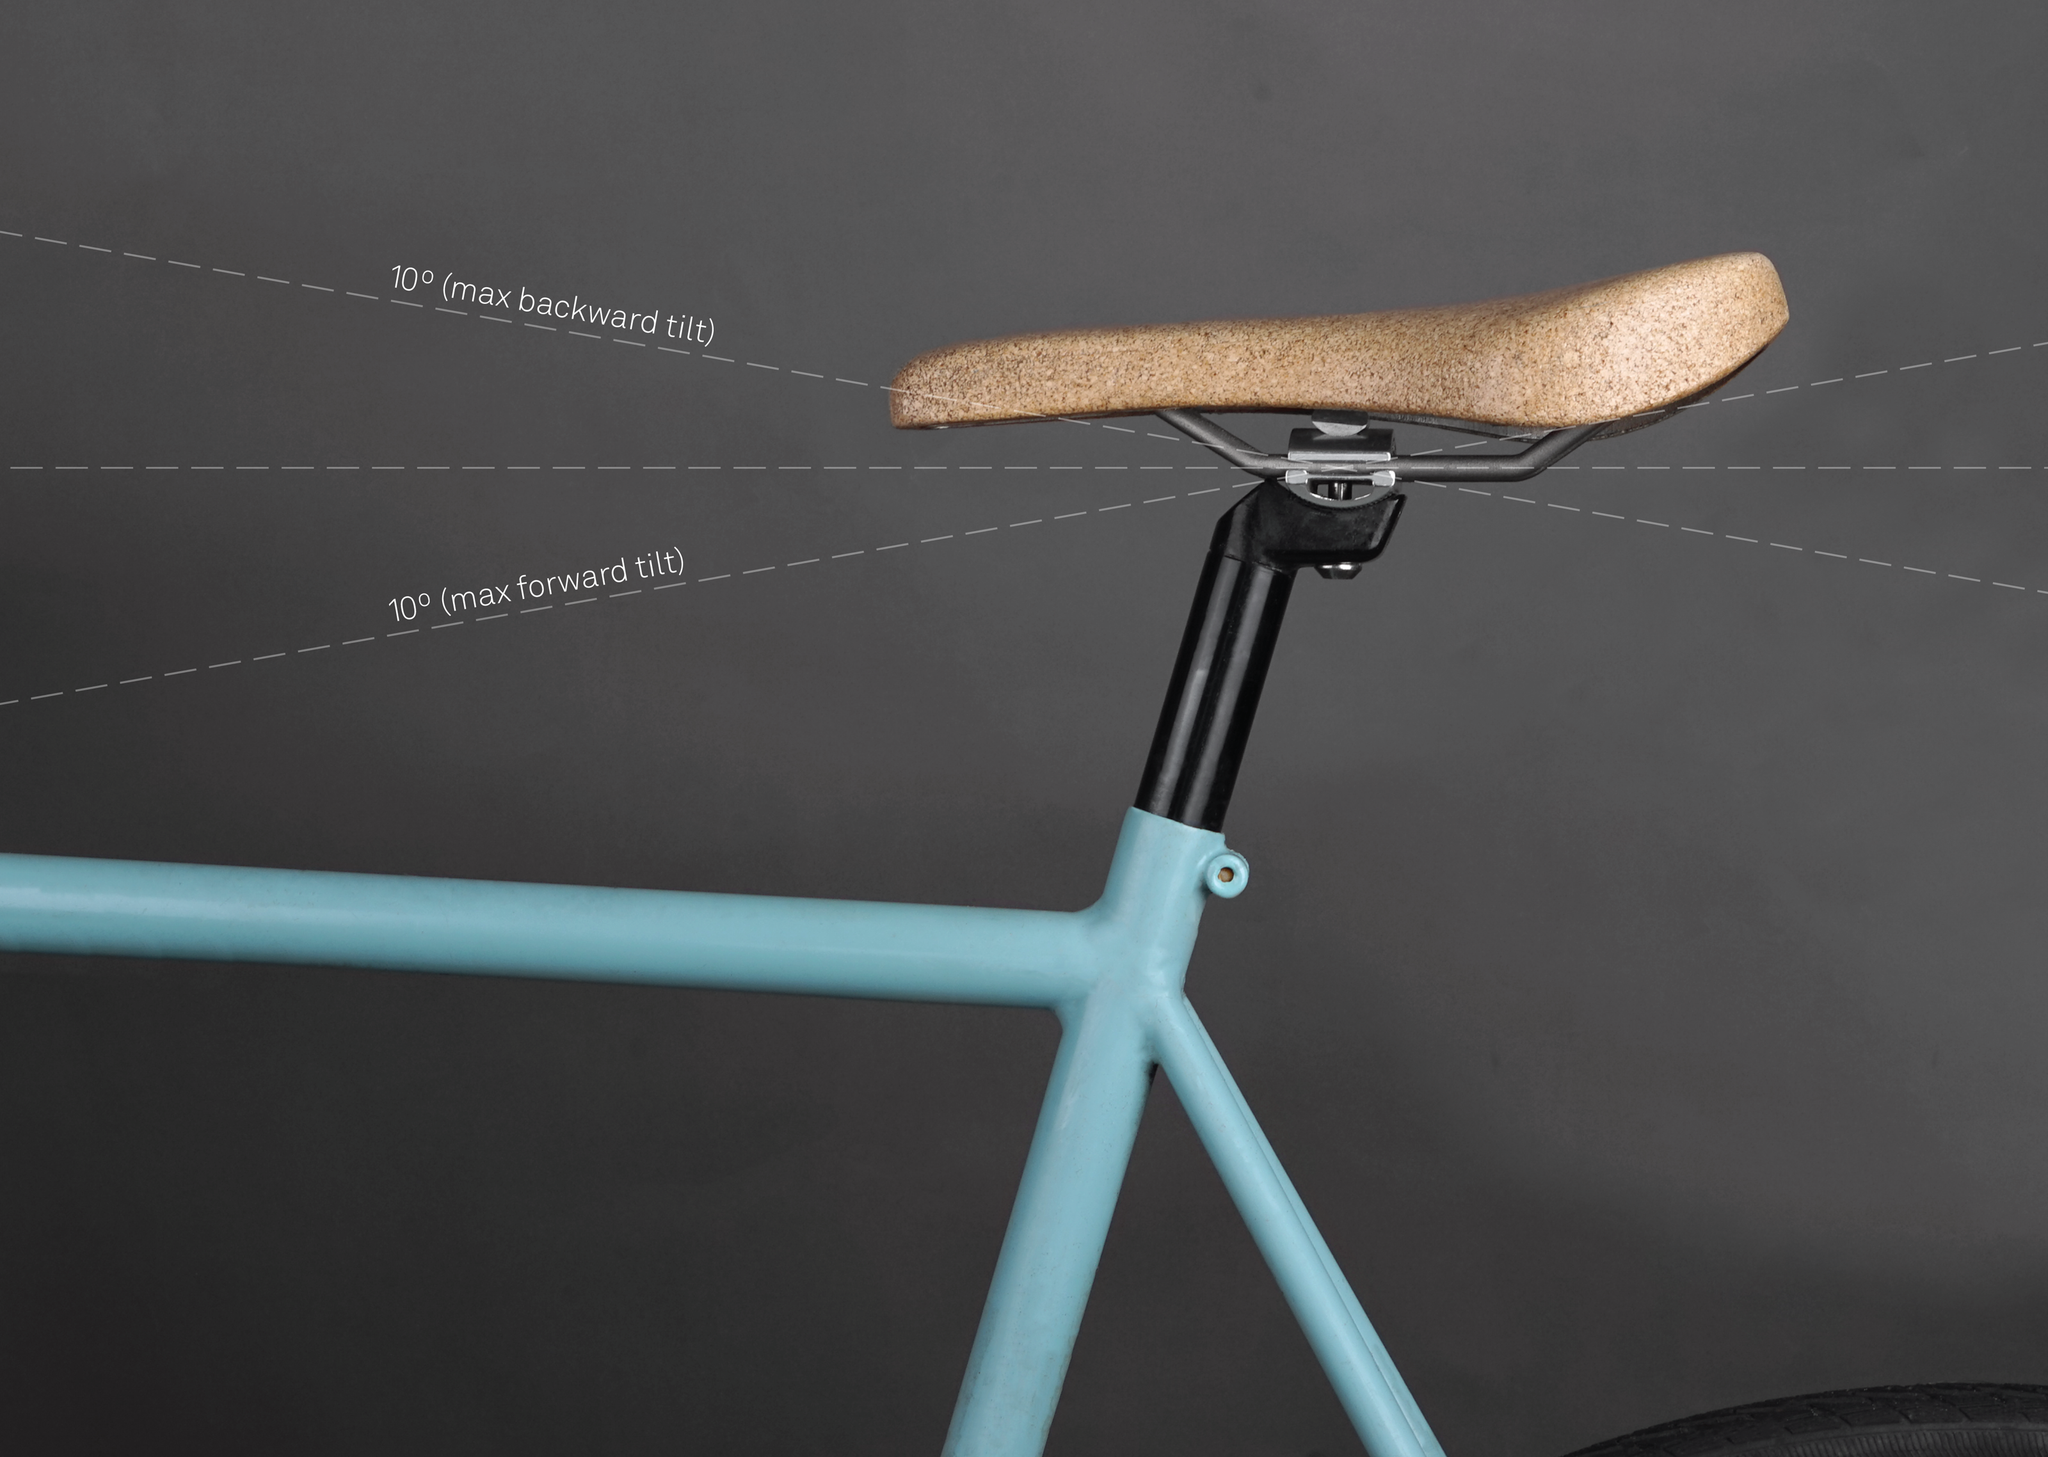 If you're planning on using your saddle for competitive racing - you need to keep the tilt <10º
3.2 Saddle height
You'll also want to adjust the saddle to the correct height.
To adjust the saddle height, you need to loosen the bolt on the back of the seat tube. Now make sure your saddle is well secured to the seat tube clamps and pull the saddle upwards. You may find that rotating it slightly left and right as you pull upwards helps to get it moving. If still stuck in place, apply some lubricant around the rim of the seat tube and try again after a minute or so.
You want to position the saddle at a height where your legs are close to fully extended whilst the pedal is at its lowest point, but there should still be some bend left in your knee.

Your leg should be not quite fully extended when the pedal is in its lowest position
Once you're satisfied with the height, you'll need to rotate the saddle so that it's dead straight. You can check it by looking from the back of the saddle along your bicycle towards the handlebar stem - the nose of the saddle should align exactly. Gently rotate the saddle so that it's straight - you may find the movement jerky, so apply lubricant as necessary and keep rotating left and right until satisfied.
Now tighten the bolt at the back of the seat tube - it'll need to be pretty tight, or else the seat post will just slide down once you sit on it.
***
3.3 Saddle set back
If you haven't tightened the bolt too much, then you'll also be able to slide the rails forwards or backwards along the clamp. Setting the saddle at the correct set back (sometimes called fore / aft) will make a huge difference to the amount of energy you're expending and also reduces the risk of back problems and muscle injury so it's worth getting this bit right.
To get your saddle set back correct relative to the bottom bracket (the part that holds the pedals), you're aiming for a position that results in you using your quadriceps (front thigh muscles) and hamstrings (rear thigh muscles) roughly equally. If you set the saddle too far forward you'll be relying too heavily on your quadriceps. If you set it too far back you'll be relying too heavily on the hamstrings. It might help to tighten the bolt and try riding at this point, and keep adjusting until you're satisfied that the set back feels right on both your hamstrings and quads.
You'll also want it to feel correct relative to the handlebar position. You'll know this is the case, if when your hands are resting on the handlebars, your arms are roughly 90º to your torso when held straight.
Assuming your bike frame is a suitable size for you, it should be possible to find a saddle set back that works with both the bottom bracket and the handlebar positions. If you're struggling to make it work, you don't necessarily need a new bike frame. There's an array of seat posts available, with different clamp positions relative to the seat tube - you can also buy seat tube set back adapters - so you may still be able to make it work.

At the correct saddle set back your torso will be roughly 90% with your quads when leaning on handle bars
Some riders may find they are able to generate a little extra power by setting the saddle slightly further forward than its natural position - and conversely that they feel a little extra comfort if setting the saddle slightly behind its natural position. It is generally unwise to stray too far in either direction however, to avoid risk of muscle injury.
Once you're completely happy with the set back of the saddle, tighten the bolt as much a you can - as long as you used plenty of lubricant, you won't damage the bolt threads with your bare hands alone.
4. Testing the saddle
At this point you've already tested the saddle a little during part 3, but it is worth going for a short cycle ride to make sure, taking a multitool with you and making further adjustments if necessary.
Once you've arrived at the correct seat position you shouldn't need to make further adjustments for many years to come.

